Free 186 More Best Homemade Tools eBook:  
Get 2,500+ tool plans, full site access, and more.

User Tag List

Results 1 to 5 of 5

Thread: QCTP 250-00x Jacobs Chuck Holder Plans

  1. #1
    Supporting Member jjr2001's Avatar
    Join Date
    Jun 2016
    Posts
    945
    Thanks
    1,191
    Thanked 2,132 Times in 568 Posts

    jjr2001's Tools

    QCTP 250-00x Jacobs Chuck Holder Plans

    If you already have one QCTP tool holder for your lathe then you can make more on the mill.
    In a way this method for the mill is a lot like the Lathe Duplicator or Copy Attachment for duplicating parts on the lathe.
    However there is not an attachment to make. Just use your mill and vise.

    1. First step is to mill a blank from the metal of your choice. Steel, Aluminum, Brass, whatever,
    This blank should be as close to the pattern (Master) part width as you can make it but long enough to make multiple copies after the milling is complete. Use a vise stop so the vise can be opened and closed as needed to insert or remove the Master. (original QCTP Tool Bit Holder)

    2.Using a pair of parallels support your blank and the original QCTP holder (Master, minus all fasteners) in your milling vise on the parallels. Since the blank and Master may be of slightly different widths use a shim of paper between the "narrow" part and the vise jaw. Set your end mill depth and width using the Master and then remove the Master and lock down the blank.

    Note: In all of the steps below the "Pattern Part" (Master) is removed prior to any milling
    and replaced in the vise prior to any measuring.

    3. You now have a "guide" (Master) for your end mill and dovetail cutters. Use a straight end mill to remove most of the depth of the "slot" portion of the dovetail. Proceed to next step after the slot is to depth.

    3. Insert the Dovetail Cutter in the Mill, the Master and blank in the vise then use the "Master" to align the cutter depth and width. I made my new holders from aluminum so I was able to take the dovetail cut in one pass. Don't forget to remove the "Master" prior to milling.

    4. Remove the QCTP chuck from the lathe and test the fit of your new Holder. It may need a little more metal removal that you can do by taking .001 cuts in the width of the dovetail and also the height if necessary. This is a cut and test method using the QCTP chuck to sneak up on the perfect fit.

    That is it, adjust for a nice close fit and you now have a strip of future holders that only need sawing apart, finishing by milling the saw cut edges, and drilling the necessary holes.

    Method 2 comes to mind where you do not have to put the "template" in the vise during milling. Just put the blank and pattern in the milling vise after applying Dykem to the end of the blank.

    1. Scribe the outline of the dovetail using a long thin scriber. You can mill close to these lines and then use the QCTP Chuck to adjust for fit.

    THE END....

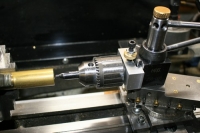
    First holder I made was one for a 3/8" jacobs chuck. I had one threaded for a 1/2-20 bolt so I just cut the bolt head from the screw
    and made a 1/2-20 stud for the chuck. Tapped the holder for 1/2-20 at the indicated spot per the drawing and there it is. This holder is one nice way to drill on the lathe without using the tail stock. Aligning the Jacobs chuck to the center line of the lathe can be as simple as using a 3/8 short
    steel pin from the lathe chuck to the Jacobs chuck. Of course there a lot of ways to make a gage or use centers for alignment.

    Cheers, JR
    Attached Thumbnails Attached Thumbnails QCTP 250-00x Jacobs Chuck Holder Plans-img_3420.jpg   QCTP 250-00x Jacobs Chuck Holder Plans-img_3419.jpg   QCTP 250-00x Jacobs Chuck Holder Plans-img_3418.jpg   QCTP 250-00x Jacobs Chuck Holder Plans-img_3421.jpg   QCTP 250-00x Jacobs Chuck Holder Plans-img_3417.jpg  

    QCTP 250-00x Jacobs Chuck Holder Plans-qctp_250_chuckexp_1.jpg  
    Attached Files Attached Files

    Download plans for chucks.

    Back to the shop.

  2. The Following 2 Users Say Thank You to jjr2001 For This Useful Post:

    Jon (Today), metric_taper (Today)

  3. #2
    Content Editor
    Supporting Member
    DIYer's Avatar
    Join Date
    Aug 2013
    Posts
    3,055
    Thanks
    798
    Thanked 1,896 Times in 1,691 Posts


    Thanks jjr2001! We've added your Jacobs Chuck Holder to our Machining category,
    as well as to your builder page: jjr2001's Homemade Tools. Your receipt:


    Download plans for chucks.

    New plans added on 01/13/2025: Click here for 2,698 plans for homemade tools.

  4. #3
    Supporting Member
    Join Date
    Aug 2021
    Location
    Cape Town SA
    Posts
    261
    Thanks
    781
    Thanked 90 Times in 41 Posts

    albertq's Tools
    What are the advantages of this over a normal tailstock mounted chuck?

  5. #4
    Supporting Member jjr2001's Avatar
    Join Date
    Jun 2016
    Posts
    945
    Thanks
    1,191
    Thanked 2,132 Times in 568 Posts

    jjr2001's Tools
    Hi Albertq,
    The biggest advantage of Drilling using the drill mounted on the carriage is that it is faster
    than cranking in/out the tail stock. You can peck drill much quicker with the carriage
    than with the tailstock. At least I can.

    Another advantage is accurate control of depth. My tail stock has a short travel so if
    I am drilling a deep hole I need to reposition the tailstock. It is doable but not as easy
    to get to the exact depth as can be done with the carriage.

    I get a better feel for the stress that is being applied to the drill bit.
    This is especially important with small diameter drill bits.

    Downside is that alignment is a bit more difficult.

    Thanks for checking in, JR
    Back to the shop.

  6. #5
    Supporting Member Saltfever's Avatar
    Join Date
    Apr 2012
    Location
    NorCal
    Posts
    416
    Thanks
    406
    Thanked 146 Times in 104 Posts

    Saltfever's Tools
    Deleted . . .


    Download plans for chucks.

    Last edited by Saltfever; Today at 02:29 PM.

Thread Information

Users Browsing this Thread

There are currently 5 users browsing this thread. (0 members and 5 guests)

Tags for this Thread

Bookmarks

Posting Permissions

  • You may not post new threads
  • You may not post replies
  • You may not post attachments
  • You may not edit your posts
  •